 Animweb Technologies
Campus boundary, buildings and staff areas
Draw the exact campus outline and lock it, give each department its building, draw the areas where staff mark attendance, and how the 30 m classroom works.
4 min read
Presence checks location in three layers. Each one is drawn once by the administration and then locked, so nothing moves by accident.
| Layer | Who draws it | Who must be inside |
|---|---|---|
| Campus boundary | The administration | Everyone who marks attendance. Outside it, Presence uses no one’s location. |
| Department building | The administration, in Academic Setup | Students in that department’s classes. |
| Staff attendance area | The administration, under Staff Zones | The teachers and staff assigned to it, when they mark their own attendance in the app. |
| Classroom | The teacher, at the start of each class | The students of that class: within 25-30 m of the teacher. |
Drawing the campus boundary
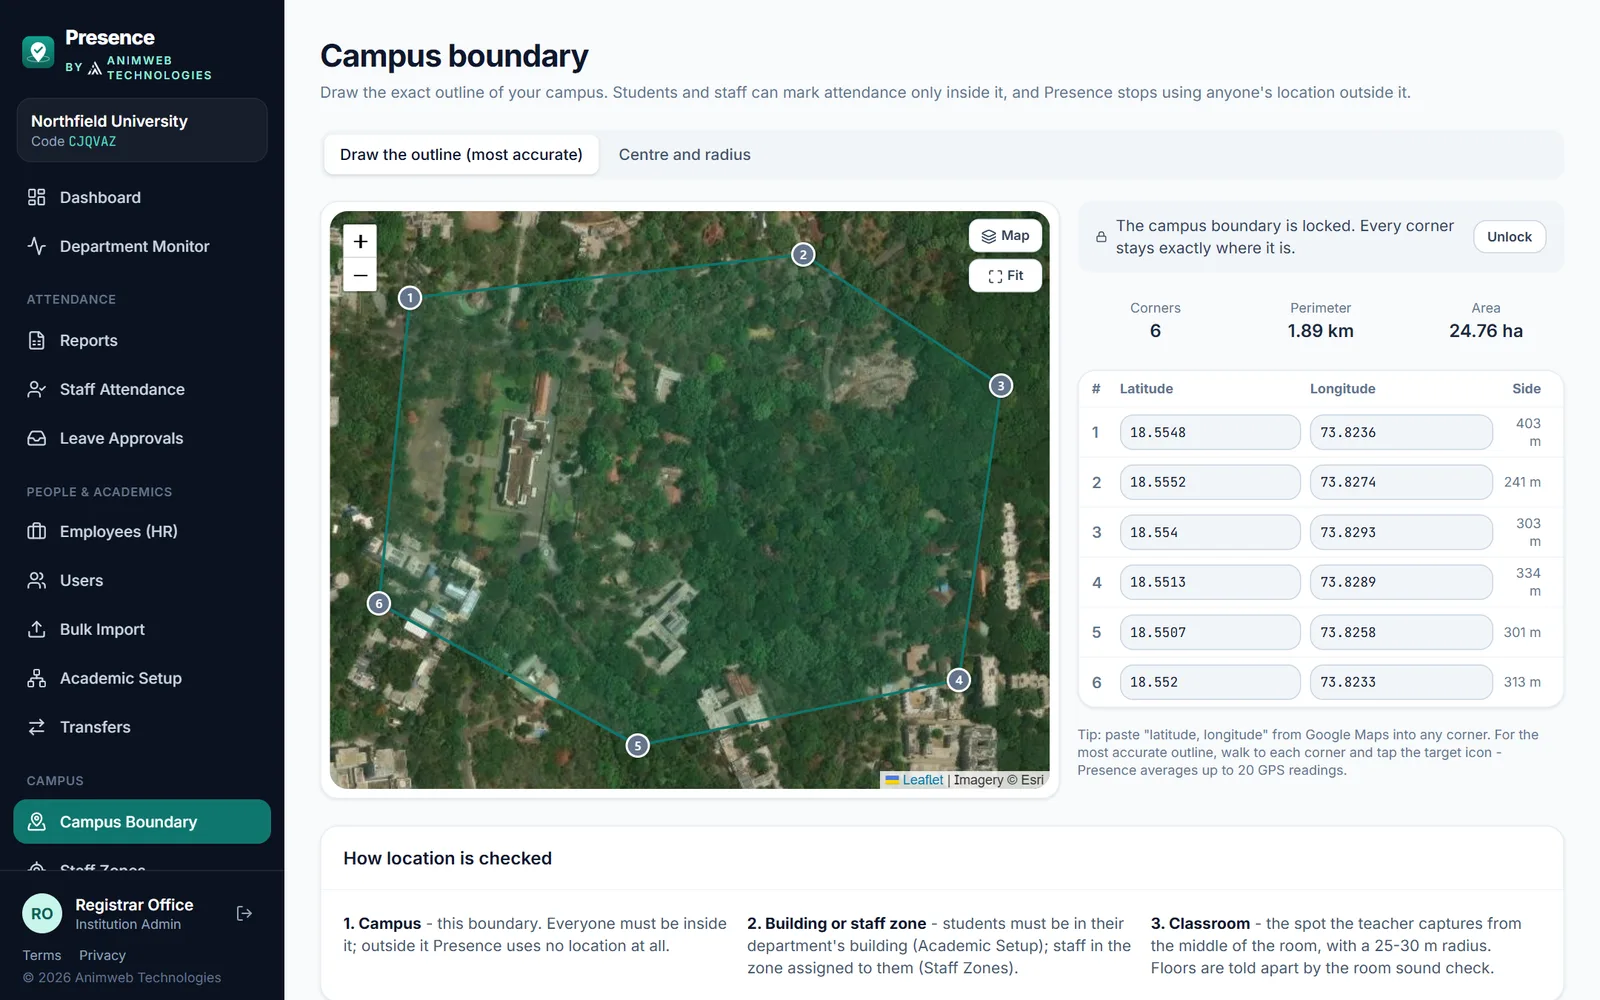
Each corner can be dragged, typed or captured on the spot. Saving locks the outline.
- Open Campus Boundary and choose Draw the outline (most accurate).
- Turn on Satellite (top right of the map) to see buildings and walls.
- Click each corner of the campus in order, going round it. A numbered marker appears at each corner.
- Make it exact:
- drag a corner to move it;
- click a small + between two corners to add a corner there;
- type or paste the exact coordinates of any corner in the table, for example
30.767543, 76.575812copied from Google Maps; - for the best accuracy, walk to a corner and tap its target icon. Presence takes up to 20 GPS readings and averages them.
- Check the figures under the map: number of corners, perimeter, area and the length of every side. A red outline means two sides cross; move the corners until it turns green.
- Click Save and lock.
Locked means locked. Once saved, no corner can move - not by a stray click and not through any other page. To change the boundary, click Unlock, make the change, then save and lock again. Every change, lock and unlock is in the Audit Log.
A simple circle (centre and radius) is still available under Centre and radius, but it usually takes in roads and neighbouring land, so the outline is better.
Department buildings
- In Academic Setup → Buildings, add each building and draw its outline the same way: click its corners on the satellite view, or stand at each corner and tap the target icon.
- In Academic Setup → Departments, edit a department and tick its Building(s).
From then on a student must be inside their department’s building, as well as inside the classroom, to mark attendance in that department’s classes. If a department uses several buildings, Presence picks the one the teacher is standing in when the class starts, and follows the teacher if they move the class to another building.
The building is checked only by its outline, never by floor. Classrooms above one another are told apart by the 30 m classroom spot and, for stacked rooms, the room sound check.
Staff attendance areas
Teachers and staff can mark their own arrival and departure from their phone, but only inside the area the administration drew for them.
- Open Staff Zones and click New zone.
- Name it (for example CSE block staff room or Administration building) and draw it - any shape, inside the campus.
- Choose who marks attendance there: whole departments, offices, or named people (for example HR or security staff).
- Click Save zone. The zone is locked like the campus boundary.
To mark attendance, staff open My Attendance → Mark arrival. Presence then:
- reads their location once and checks it is inside one of their zones (within ±50 m accuracy);
- asks them to look at the camera and matches their face with their own Face ID, so nobody can mark attendance for a colleague.
Their first mark of the day is their arrival and a later one is their departure, exactly as at the gate kiosk. Staff without a zone keep using the gate kiosk. The location is used only for this check and is not stored.
The classroom: 25-30 m around the teacher
When starting a class, the teacher stands in the middle of the room and taps Capture classroom location. The default radius is 30 m (20-60 m can be chosen; more only for large halls). Each student’s phone checks this radius itself on every GPS reading, so the servers do very little work even when thousands of students mark attendance at the same time.
The next class in the same room. When a teacher types the room name (for example AB1-204), Presence offers the location saved by an earlier class in that room, most precise first. The teacher picks it and still captures their own position; Presence uses the saved spot only if the teacher is actually standing in that room, so a location can never be borrowed from elsewhere.
Privacy
- Outside the campus boundary, Presence does not use anyone’s location.
- Students’ location is used only while they are in a live class.
- Staff location is used once when they mark attendance. A rough position is shared with their head only if they agree - see My Work.